After trying pertronix site and realizing its exactly the same as the printed documents; I found this website http://mustangsplus.com/tech/prtronix/index.html with picture and step by step I was in in less than 15 minutes.
For reasons of insanity:
Pertronix Electronic Igintion
Module Installation Techinque
ignitor.jpg (24179 bytes)
Pertronix Ignitor Electronic
Ignition Conversion
When we tell our customers how easy it is to install a Pertronix Ignitor on their Mustang, they usually get a blank stare on their face as if to say "It can't be that easy!" Well, it is and we're going to prove it to you!
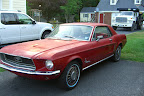
Follow along as we install a Petronix Ignitor on Mustangs Plus' Dan Jenkins' newly acquired project car, a 64½ coupe. Built at San Jose on July 20th, it's equipped with a "D" code 289 engine.
Dan wanted to get it running its best before deciding which restoration job to tackle first. So installing a Petronix Ignitor was a natural!
Dan's new pony is a great daily driver, but it has a lot of little problems that need to be corrected. We know we'll be seeing a lot of it on Tech Night! Dan's already talking about door hinges.............

ptrnx01.jpg (19464 bytes) 1.) The Petronix Ignitor we'll use is a #04581 which fits all 1965 to 1973 V8 Mustangs. Included in the kit is the Petronix module, the magnet sleeve, 2 nuts, a wire end, and an air gap gauge. Everything you'll need to do the job except for a flat blade screw driver, a 3\8" open end wrench, and a pair of wire cutters.
igdividr.gif (3596 bytes)
2.) Make sure the ignition is off and the battery is disconnected. Remove the distributor cap and rotor leaving the spark plug wires attached.

igdividr.gif (3596 bytes)
ptrnx02.jpg (18390 bytes)

ptrnx03.jpg (17401 bytes)
3.) Remove the primary lead (the wire to the distributor) from the negative (-) side of the coil.
igdividr.gif (3596 bytes)
4 .) With the screwdriver, remove the screws holding the points and condenser.

ptrnx04.jpg (16245 bytes)
ignitor.jpg (24179 bytes)
Pertronix Ignitor Electronic Ignition Conversion

ptrnx05.jpg (18847 bytes)
5.) Lift the points, condensor, and primary lead out as a unit. You may have to slide the rubber insulator on the primary lead up out of the distributor base. Sometimes they can be a little stuborn!
igdividr.gif (3596 bytes)
6.) This is how your points, condensor, and primary lead should come out. There's no need to take all the pieces apart separately since they're all going in the trash!

ptrnx06.jpg (10552 bytes)
igdividr.gif (3596 bytes)

ptrnx07.jpg (20505 bytes)
7.) Remove the ignition wire from the positive (+) side of the coil. If it still has the original press on cap, you'll need to cut the cap off, strip about 1\4" of the wire covering off, and crimp on the wire end provided in the Petronix kit. It's best to solder the wire to the end so that it will not vibrate or pull loose later. Dan's had already been chaged by a previous owner.
igdividr.gif (3596 bytes)
8.) This next step is purely your choice. The wire leads on the Petronix unit are long because not all coils are the same distance from the distributor. We chose to measure the distance from the distributor to the coil and then cut the wire leads to shorten them. We then crimped new ends on and then soldered the ends to the wires.

ptrnx08.jpg (18489 bytes)
ignitor.jpg (24179 bytes)
Pertronix Ignitor Electronic
Ignition Conversion

ptrnx09.jpg (11450 bytes) 9.) This shows our Petronix module after we shortened the wiring. Notice how much we took off!
igdividr.gif (3596 bytes)
10.) Set the Petronix unit in the distributor. There is a locating pin on the end of the Petronix module furthest away from the lead wires. This locating pin acts as a pivot for the unit to be moved closer or further away from the magnet sleeve. Make sure the pin is in the locating hole then, with the screwdriver, install the screw to hold the unit in place.

ptrnx10.jpg (17411 bytes)
igdividr.gif (3596 bytes)

ptrnx11.jpg (18187 bytes)
11.) Drop the magnet sleeve over the distributor shaft lobes and push it down. It will fit snugly over the lobes and bottom out.
igdividr.gif (3596 bytes)
12.) Using the plastic air gap gauge as a feeler gauge, set the gap between the magnet sleeve and the Petronix module. Don't worry about getting it perfect. This measurement is not as important as a point gap setting. Just get it in the ballpark and it will be fine.

ptrnx12.jpg (19025 bytes)
ignitor.jpg (24179 bytes)
Pertronix Ignitor Electronic
Ignition Conversion

ptrnx13.jpg (19550 bytes) 13.) Be sure the rubber insulator that is on the wire leads is installed in the distributor housing. The wires inside the housing should have some slack but should not rub on anything inside the cap. They will slip through the rubber insulator for adjustment.
igdividr.gif (3596 bytes)
14.) Install the rotor and cap.

ptrnx14.jpg (20788 bytes)
igdividr.gif (3596 bytes)

ptrnx15.jpg (17622 bytes)
15.) Connect the Black wire from the Petronix module to the negative (-) side of the coil. Connect the Red wire from the Petronix module and the ignition wire to the positive (+) side of the coil. CAUTION: Do not reverse these wires as it will destroy the module and void the warranty! Use the nuts provided and tighten them with the 3\8" wrench. Your Petronix is now installed. Reconnect your battery, and your car is now ready to start. No adjustment of the timing is necessary!
igdividr.gif (3596 bytes)
16.) We hope you've found this How To Install A Petronix Article informative and useful. Need a Petronix for your tow vechicle or another manufacturer other than Ford? Mustangs Plus stocks Petronix for almost every American made car from the 1950's to present. Be sure to call or e-mail us with your needs!

ptrnx16.jpg (22105 bytes)